Texas Hail Damage Roof Insurance Claims: A Homeowner's Step-by-Step Guide to Getting Your Claim Paid
| By TriVAN Roofing | 15 min read
A severe hailstorm just hit your Texas home. What now? This guide shows homeowners the exact steps for filing a roof insurance claim, from documenting damage in the first 24 hours to getting your full replacement cost value paid. Avoid costly mistake
Categories: Roof Repairs & Restoration
Surviving the Storm: Your Step-by-Step Guide to Texas Hail Damage Roof Claims
The sound of hail pounding on your roof is unnerving. Once the storm passes and silence returns, a wave of uncertainty can set in. What just happened to my roof? Is it damaged? And if it is, what do I do next? For Texas homeowners, this is an all-too-common scenario. When a major hailstorm rolls through, the aftermath can be more confusing than the storm itself.
If you're reading this, you likely have a damaged roof right now and need clear guidance immediately. This guide is built for you. It skips the background noise and provides a direct, step-by-step plan for navigating the residential hail damage insurance claim process in Texas. Following these steps will help you document your claim properly, work effectively with your insurance company, and secure the funds needed for a comprehensive storm damage restoration.
Step 1: What to Do in the First 24 Hours
Your actions immediately following a hailstorm are critical. Before you call anyone, take these initial steps to establish a baseline for your claim.
Confirm the Storm at Your Address
First, verify that a significant storm did, in fact, occur at your specific location. Insurance companies use meteorological data to validate claims. You can use free resources like the National Weather Service's Storm Prediction Center or other weather-tracking services to pull a report for your address on the date of the storm. This confirms the presence and size of hail in your immediate area.
Perform a Ground-Level Inspection
Do not get on your roof. It can be slippery and dangerous, especially after a storm. You can gather a tremendous amount of evidence from the ground. Walk your entire property and look for obvious signs of hail impact:
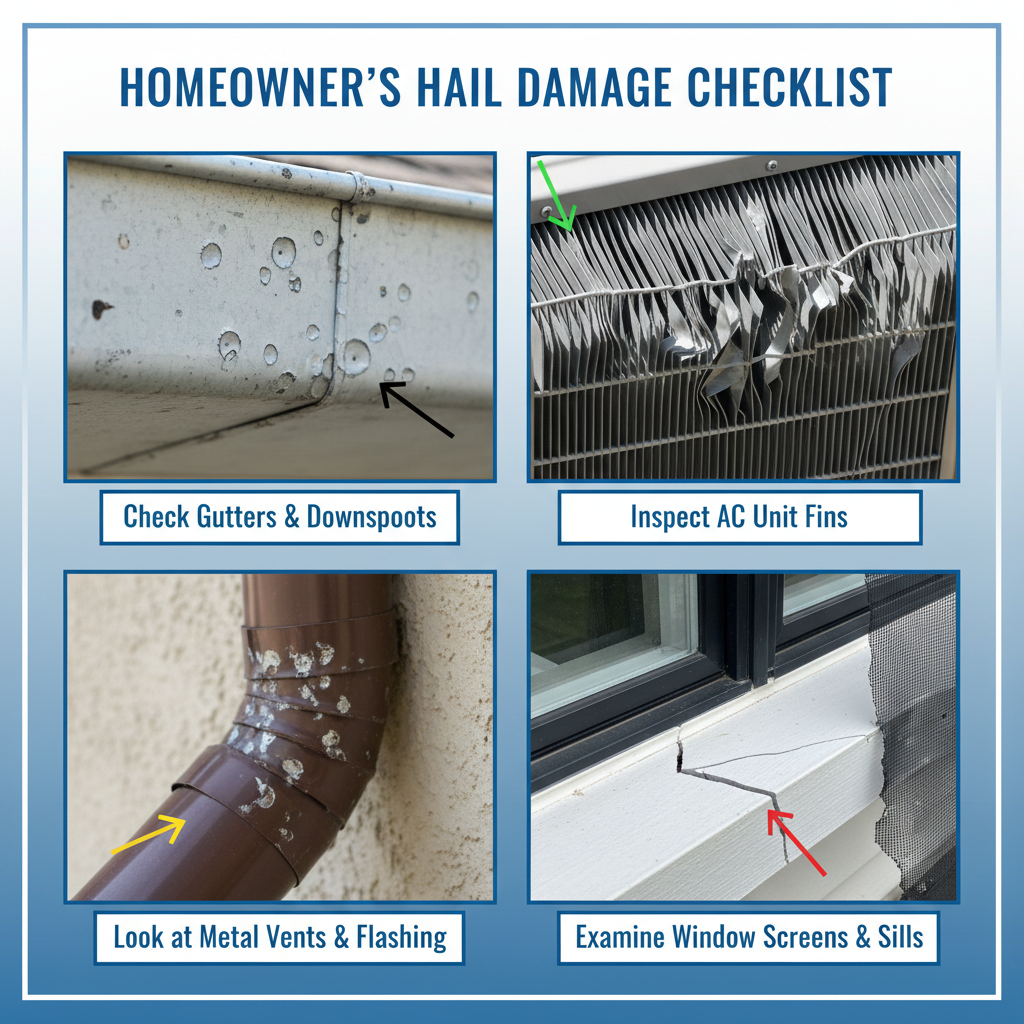
- Soft Metals: Check gutters, downspouts, roof vents, and the thin metal fins on your outdoor air conditioning unit. These surfaces dent easily and provide clear proof of hail.
- Windows and Siding: Look for cracked vinyl window frames, torn window screens, or chipped paint and dents on siding.
- Other Items: Inspect your mailbox, patio furniture, and any cars that were left outside for dents and dings.
Photograph Everything Before Cleanup
Using your smartphone, take pictures of everything you find. Capture wide shots of each side of your house and then close-up shots of individual hail impacts. If you find hailstones on the ground, place a coin or measuring tape next to them for scale before taking a picture. This initial photo library is your first set of evidence. Documenting the damage before any repairs or cleanup begin is crucial.
Notify Your Insurance Carrier
Finally, call your insurance company's claims hotline or use their mobile app to report a potential claim. You don't need to know the full extent of the damage yet. Simply state that your property was hit by a hailstorm on a specific date and you believe your roof may be damaged. Most homeowner policies require "prompt notification" after a loss. Reporting it quickly starts the official clock and prevents potential disputes about reporting delays down the line.
Step 2: Gather Evidence Your Insurer Will Actually Use
Insurance adjusters need specific, objective evidence to approve a roof replacement claim. While a contractor's opinion is helpful, the physical proof you gather is what substantiates the claim. After your initial ground-level check, it's time to document the damage more systematically.
Why Soft Metals Are Your Best Evidence
Hail impact evidence on soft metal surfaces is the most compelling documentation you can collect. Metal tells the story of a storm better than any other material. Gutters, downspout elbows, window AC unit fins, and HVAC condenser fins all show hail impacts as distinct, circular dents. These dents accomplish two things: they prove the storm occurred at your home, and the diameter of the dents helps establish the size of the hailstones. A homeowner who photographs these surfaces systematically within 24 hours of a storm is building an evidence record that supports the roof claim before anyone gets on the roof.

The story of a hailstorm is told on your property's soft metal surfaces. Before even looking at the roof, photograph any dents on gutters, downspouts, metal vents, and the delicate fins of your HVAC unit. These impacts are undeniable proof of hail size and intensity, providing the collateral evidence adjusters need to validate a roof damage claim.
Documenting the Roof Surface
Once an adjuster or a qualified roofer is safely on your roof, the focus shifts to the roofing material itself. Different residential roofing systems show damage in different ways.
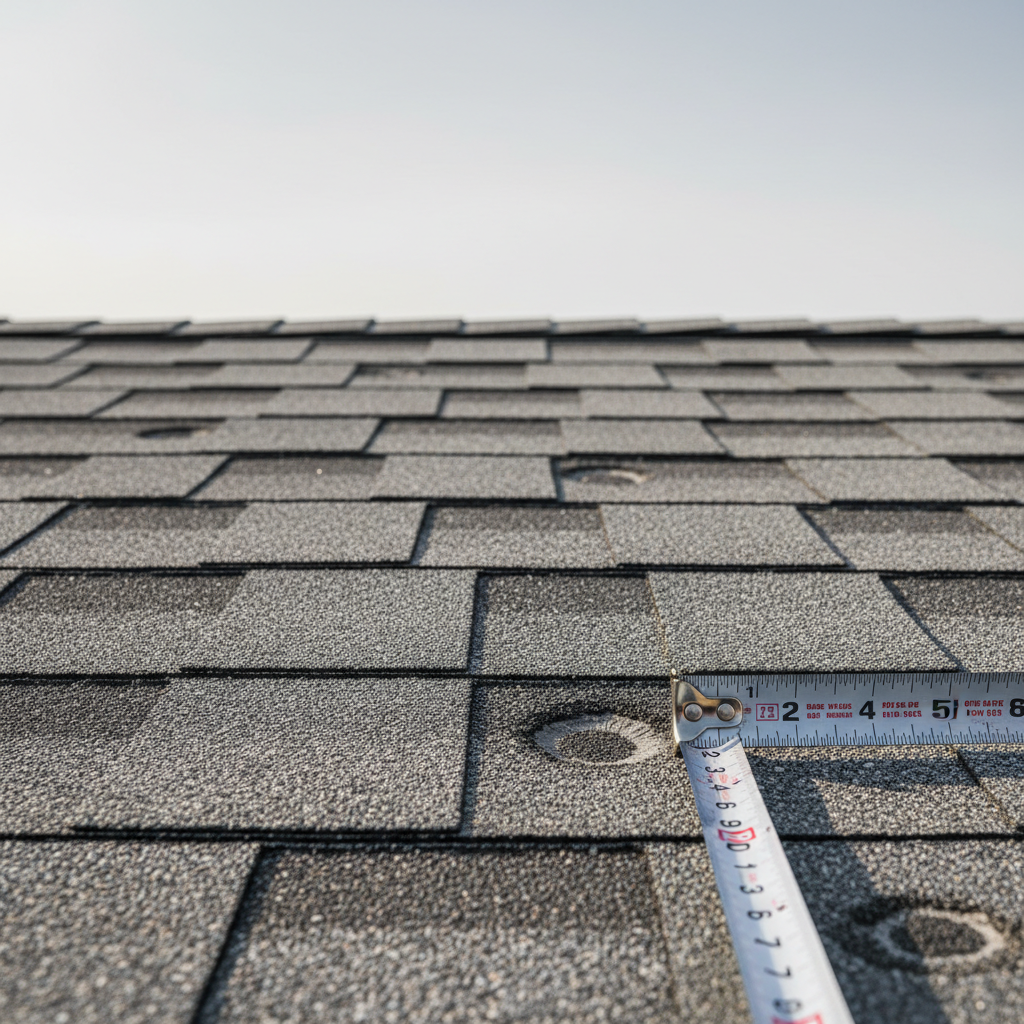
- Asphalt Shingles: This is the most common residential roof type in Texas. Hail damage on asphalt shingles appears as circular bruises or impact marks where the protective ceramic granules have been displaced. This exposes the underlying fiberglass mat to sun and moisture, which rapidly degrades the shingle and voids its warranty. Adjusters will often mark these impacts with chalk and photograph them with a measuring tape to show the hail's diameter.
- Metal Roofing: Hail damage on metal roofs is more straightforward. It shows up as denting without any granule loss. The key is to document the pattern and density of the dents across the entire roof.
An adjuster isn't just looking for one or two impacts. They are looking for a pattern of damage distributed across multiple slopes of the roof. This demonstrates that the damage was caused by widespread hail, not by a falling tree branch or other isolated event. A qualified roofing contractor can help you identify and document this pattern.
Step 3: The Residential Insurance Claim Process, Demystified
The claim process can seem like a black box to many homeowners. Here is the typical sequence of events from notification to settlement.
- Claim Assignment: After you notify your carrier, they will assign a claim number and an insurance adjuster. This adjuster is an employee of, or contractor for, your insurance company.
- The Adjuster's Inspection: The adjuster will schedule a time to inspect your property. Depending on claim volume after a widespread storm, this could take anywhere from 5 to 15 business days. You or a trusted contractor should be present for this inspection to point out all documented damage.
- The Estimate (Statement of Loss): After the inspection, the adjuster will prepare an estimate of the covered damage. They use specialized software, most commonly Xactimate, which calculates repair or replacement costs based on current, local pricing for labor and materials. This document, often called a "Statement of Loss," is the insurance company's initial assessment of their liability. It is not a final, take-it-or-leave-it offer.
- The First Payment (ACV): If the claim is approved for a replacement, the carrier will typically issue the first of two payments. This check is for the Actual Cash Value (ACV) of your roof. We will cover this in detail in the next section.
- Completing Repairs: You will use the ACV payment to hire a contractor and begin the roof replacement.
- The Final Payment (Recoverable Depreciation): Once the work is complete, you submit the final contractor's invoice to the insurance company. They will then release the remaining funds, known as the Recoverable Depreciation.
This two-payment structure often surprises homeowners who expect one check for the full replacement cost upfront. Understanding it before filing helps you plan for the cash flow required to bridge the gap between the first and second payments.
Understanding Recoverable Depreciation: The Most Confusing Part of Your Claim
The single most misunderstood element of residential hail claims is "recoverable depreciation." If your homeowner's policy includes Replacement Cost Value (RCV) coverage for your roof, you are entitled to the full cost of replacing it with new materials of similar kind and quality, minus your deductible. However, the insurance company doesn't pay it all at once.
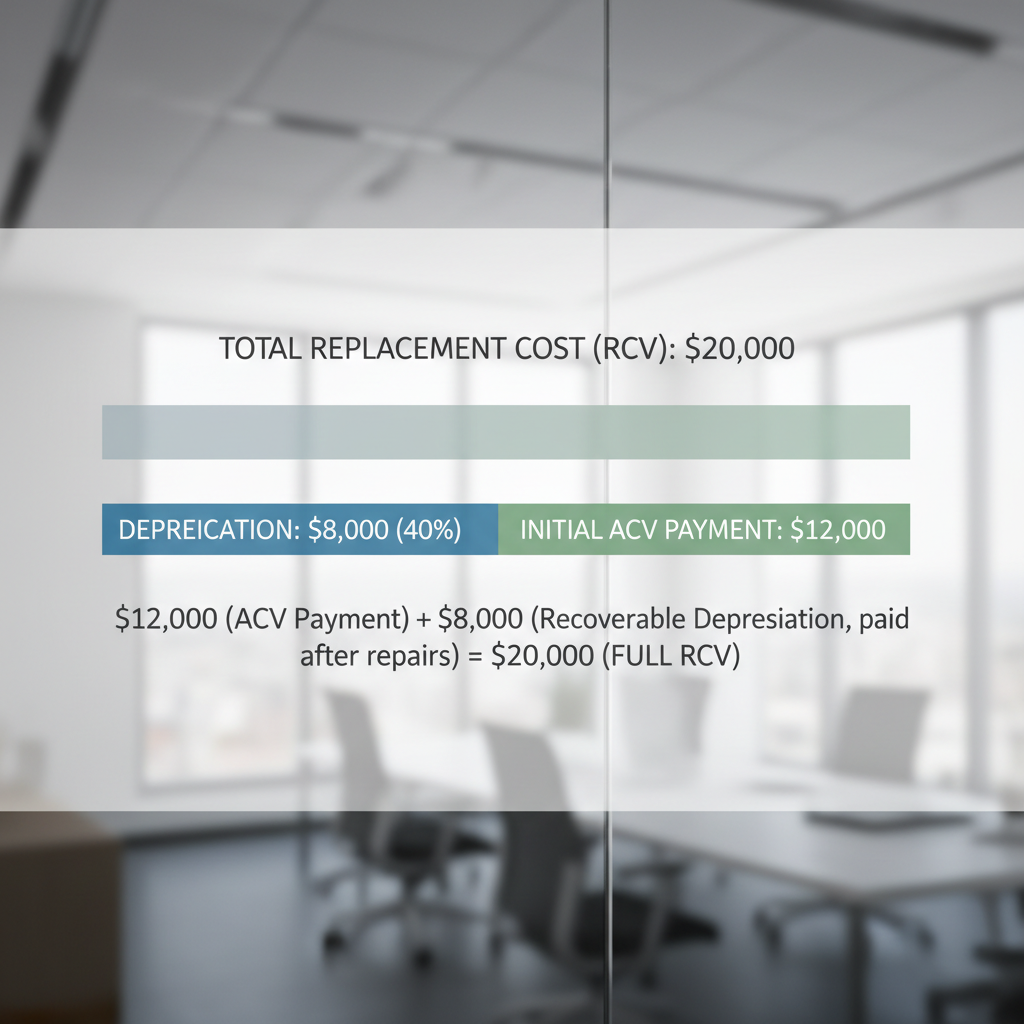
Here’s how it works:
- Replacement Cost Value (RCV): This is the total amount it will cost to replace your roof today. Let's say it's $20,000.
- Depreciation: The insurance company calculates a depreciation amount based on your old roof's age and condition. A 15-year-old asphalt shingle roof with a 30-year expected lifespan might be depreciated by 50%. In our example, that's $10,000 in depreciation.
- Actual Cash Value (ACV): The ACV is the RCV minus the depreciation ($20,000 - $10,000 = $10,000).
Your first insurance check will be for the ACV amount, minus your deductible. If your deductible is $2,000, your first check would be $8,000 ($10,000 ACV - $2,000 Deductible).

Most homeowner policies with Replacement Cost Value (RCV) coverage pay claims in two parts. The first check is for the Actual Cash Value (ACV), which is the replacement cost minus depreciation for the roof's age and wear. The second check, for the "recoverable depreciation," is released only after you complete the repairs and provide an invoice to the insurance company.
The $10,000 in depreciation is "recoverable." To get that money, you must actually have the roof replaced and submit a final, paid invoice from your contractor to the insurance company. Once they receive proof that you spent the money to complete the work, they will "release" the $10,000 in depreciation as your final payment.
Many homeowners mistakenly believe the initial ACV check is the full settlement. They try to find a roofer to do the job for that amount, which is often impossible without cutting corners. Others decide not to do the repairs and pocket the ACV check. This is a critical error. If you don't complete the repairs, you forfeit your right to collect the recoverable depreciation, effectively losing a significant portion of the insurance coverage you've been paying for.
A Critical Warning: Spotting and Avoiding Storm Chasers
After a major Texas hailstorm, your neighborhood will be flooded with roofing contractors. While many are reputable, many others are "storm chasers." These transient contractors descend on neighborhoods hit by hail, using high-pressure tactics to get homeowners to sign binding contracts before they have a chance to understand their insurance coverage or vet the company. They perform shoddy work, use inferior materials, and are gone as soon as the work is done, leaving you with no recourse when the roof inevitably fails.
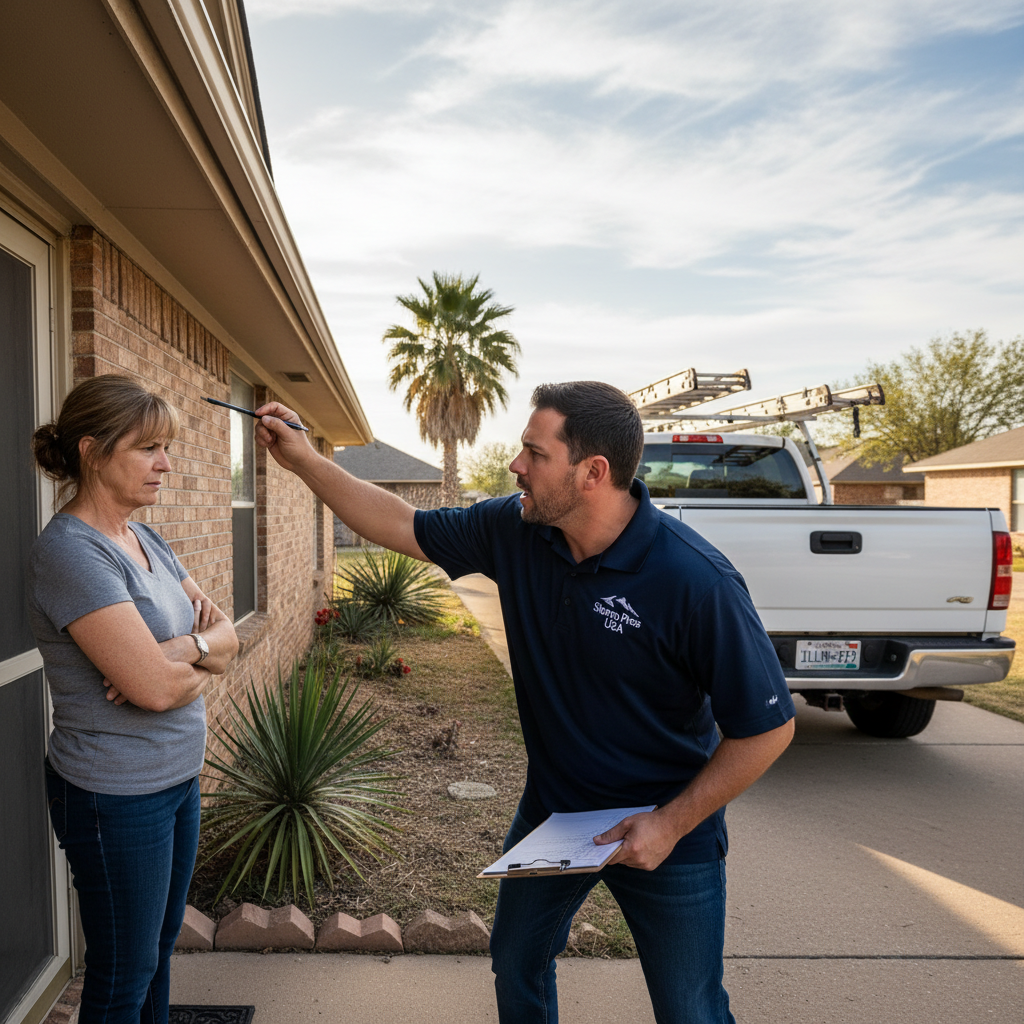

Be cautious of contractors who appear at your door immediately after a storm, especially those with out-of-state plates. A common tactic is to pressure you into signing a contract or an "Assignment of Benefits" on the spot. Never sign anything under pressure and always wait for your insurance adjuster's initial assessment before hiring a contractor.
Here are specific red flags to watch for:
- High-Pressure Sales Tactics: They insist you must sign a contract today "to lock in a spot." A reputable contractor will give you time to consider their estimate.
- Offers to Waive Your Deductible: A contractor offering to "eat" or rebate your deductible is asking you to commit insurance fraud. Texas Insurance Code Chapter 707 makes this illegal for both the contractor and the homeowner.
- Out-of-State License Plates: If their truck has plates from Florida, Illinois, or anywhere else, be extremely wary. They have no local reputation to protect.
- No Local Address or Phone Number: They should have a physical office and a long-standing history in your area. Ask for local references from jobs completed more than a year ago.
- Inability to Provide Insurance: Ask for a current certificate of general liability and workers' compensation insurance. It should name your property address for the dates work will be performed.
A contractor who can't wait 48 hours for you to perform basic verification is not a contractor worth hiring.
The Public Adjuster Option in Texas
What if you receive a settlement offer from your insurance company that seems far too low, or your claim is denied altogether? Some Texas homeowners in this situation consider hiring a public adjuster.
A public adjuster is an insurance professional licensed by the state who works for you, the policyholder, not the insurance company. They will review your policy, document the damage, and negotiate a settlement with your insurance carrier on your behalf. For this service, they typically charge a fee of 10% to 15% of the total settlement amount.
A public adjuster might be a good option if:
- Your claim is very large or complex, involving damage to more than just the roof.
- The gap between your contractor's estimate and the insurance company's offer is significant.
- Your claim has been unfairly denied, and you feel unable to manage the dispute process yourself.
You can verify that a public adjuster is licensed in Texas through the Texas Department of Insurance (TDI) website. While not necessary for every claim, they are a legitimate option for homeowners facing a difficult or disputed settlement.
How to Select the Right Contractor for Your Hail-Damaged Roof
Choosing the right contractor is the most important decision you will make in this process. The quality of their work determines the long-term health of your roof.
Here is the ideal sequence:
- Wait for the Insurance Adjuster's Report. Do not sign a contract with a roofer before your insurance company has performed their inspection. This ensures you know the baseline scope of work your carrier is willing to pay for.
- Get 2-3 Written Estimates. Contact established, local roofing contractors. Choose a local contractor with deep roots in the community, not one who just showed up after the storm. Provide each contractor with a copy of your insurance adjuster's estimate.
- Compare Estimates to the Insurance Scope. Ask the contractors if the adjuster's scope is complete. A good roofer will identify items the adjuster may have missed, such as code-required upgrades, flashing, or ventilation. If there are discrepancies, the contractor can submit a "supplemental request" to the insurance company with evidence to justify the additional costs.
- Verify and Select. Choose your contractor based on more than just price. The lowest bid is rarely the best long-term value. Evaluate them on:
- Licensing and Insurance: Verify they are properly insured.
- Local References: Call their past customers.
- Written Warranty Terms: Understand what their workmanship warranty covers and for how long. Review their written warranty terms carefully.
- Material Quality: Ensure they are using high-quality materials from reputable manufacturers like GAF or Duro-Last.
Know Your Rights: The Texas Prompt Payment of Claims Act
Texas law provides specific protections for policyholders to ensure claims are handled in a timely manner. The Texas Insurance Code, often called the Prompt Payment of Claims Act, sets clear deadlines for insurance companies:
- 15 Days to Acknowledge: Once you file a claim, the carrier must acknowledge it and begin their investigation within 15 calendar days.
- 15 Business Days to Decide: After receiving all requested documentation, the carrier has 15 business days to review and notify you in writing whether the claim is being accepted or denied. (They can extend this by 15 days with proper notification.)
- 5 Business Days to Pay: Once the carrier agrees to pay a claim, they must issue payment within 5 business days.
Carriers who violate these deadlines may be liable for interest penalties on the claim amount. If you believe your carrier is improperly delaying or denying your claim, you can file a complaint with the Texas Department of Insurance.
Final Steps: Post-Repair Documentation and Closing Your Claim
Once your new roof is installed, there are a few final steps to complete the claim process and ensure you receive your full settlement.
- Obtain and Review the Final Invoice: Get a detailed invoice from your contractor showing the total cost of the project and marking it as paid in full once you have paid them.
- Submit for Recoverable Depreciation: Send a copy of the final, paid invoice to your insurance adjuster with a written request to release the recoverable depreciation.
- Keep All Records Permanently: Create a file, physical or digital, and keep everything related to this claim: the insurance estimate, all correspondence, your contractor's contract and warranty, final invoices, and photos of the completed project. This file is the official history of your roof and will be invaluable for future insurance claims, property sale disclosures, or warranty claims.
A hailstorm can be a major disruption, but it doesn't have to be a financial disaster. By understanding the process, documenting your damage, and choosing the right partners, you can navigate your claim with confidence. If you're feeling overwhelmed, don't hesitate to contact a licensed professional for guidance.
Navigating a residential hail damage claim is complex, but you don't have to do it alone. For over 24 years, TriVAN Roofing has helped homeowners across Texas and Oklahoma restore their properties with integrity. As a GAF Master Elite and Duro-Last Elite Contractor, we bring a level of expertise that less than 3% of roofers nationwide can offer. We understand the local insurance landscape and work to ensure your claim is documented correctly from the start. Our process is transparent, and our 15-year transferable NDL warranty provides lasting peace of mind. Don't let a storm compromise your home's value. Call TriVAN Roofing at 877-487-4826 for a free, no-obligation inspection today.
All 14 deliverables complete.Tags: hail damage roof insurance claim Texas, residential hail damage roof claim Texas, how to file hail damage roof claim Texas, Texas homeowner roof insurance claim hail, hail damage roof replacement insurance Texas, roof insurance claim process Texas, hail damage claim roof DFW, residential roof hail damage claim guide, recoverable depreciation roof claim Texas, storm chaser roofing contractor Texas warning