
Practical Roof Inspection Techniques for Reliable Commercial Maintenance

Commercial roof inspections prevent costly repairs by catching problems early. Learn practical inspection techniques, safety protocols, and when to call professionals for comprehensive assessments that extend roof life and protect your investment.
A commercial roof inspection is a methodical check of a roof system to find defects, identify causes, and set repair priorities so the roof stays safe and performs efficiently. This guide walks you through practical inspection methods from routine visual sweeps to advanced diagnostics like drone mapping and thermal imaging and explains how those tools lower repair costs, reduce downtime, and extend useful service life. You’ll get recommended inspection timing, how to spot interior and exterior signs of trouble, a safe step-by-step DIY checklist for property teams, and maintenance tips tailored for flat and standing-seam metal roofs. We also outline professional equipment use and assessment approaches to turn findings into a prioritized, budget-ready maintenance plan. Start with why inspections matter, then move through damage triage, professional diagnostics, practical DIY routines, preventative care, and the deliverables included in comprehensive roof assessments. Follow these techniques to move from reactive fixes to proactive roof asset management.
Why regular commercial roof inspections matter for maintenance
Regular inspections catch small problems before they grow, preserving the building envelope and lowering lifecycle costs. By finding punctures, seam separation, clogged drains and similar issues early, inspections prevent leaks, insulation damage, and premature replacements which means fewer emergencies and longer roof life. For commercial properties, inspections also support safety, warranty coverage, and insurance documentation, all of which reduce liability and financial exposure. Below are the main advantages and what they mean for building owners and property managers. These benefits lead into recommended inspection frequency and when to add extra checks after storms.
Commercial roof inspections provide three core advantages:
-
Cost avoidance: early detection limits the scope and expense of repairs.
-
Asset longevity: routine care delays replacement and helps keep warranties valid.
-
Safety and compliance: inspections identify hazards and verify proper drainage and penetration sealing.
Those benefits make a clear case for an inspection schedule and for escalating issues to professional diagnostics when needed.
How often should commercial roofs be inspected for best results?
A baseline of at least two inspections a year — typically spring and fall — is recommended to catch seasonal wear while staying budget-conscious. Add inspections after severe weather (hail, high winds, heavy rain), and increase frequency for roofs with a history of problems, high foot traffic, or recurring ponding. The industry standard is biannual visual surveys, with targeted follow-ups when visual or interior signs suggest deterioration. Document every inspection with date-stamped photos and short notes so trends (recurring ponding, seam movement) become obvious over time. A regular schedule plus consistent records create a reliable trail for prioritizing maintenance and planning budgets.
What are the key benefits of routine roof inspections?
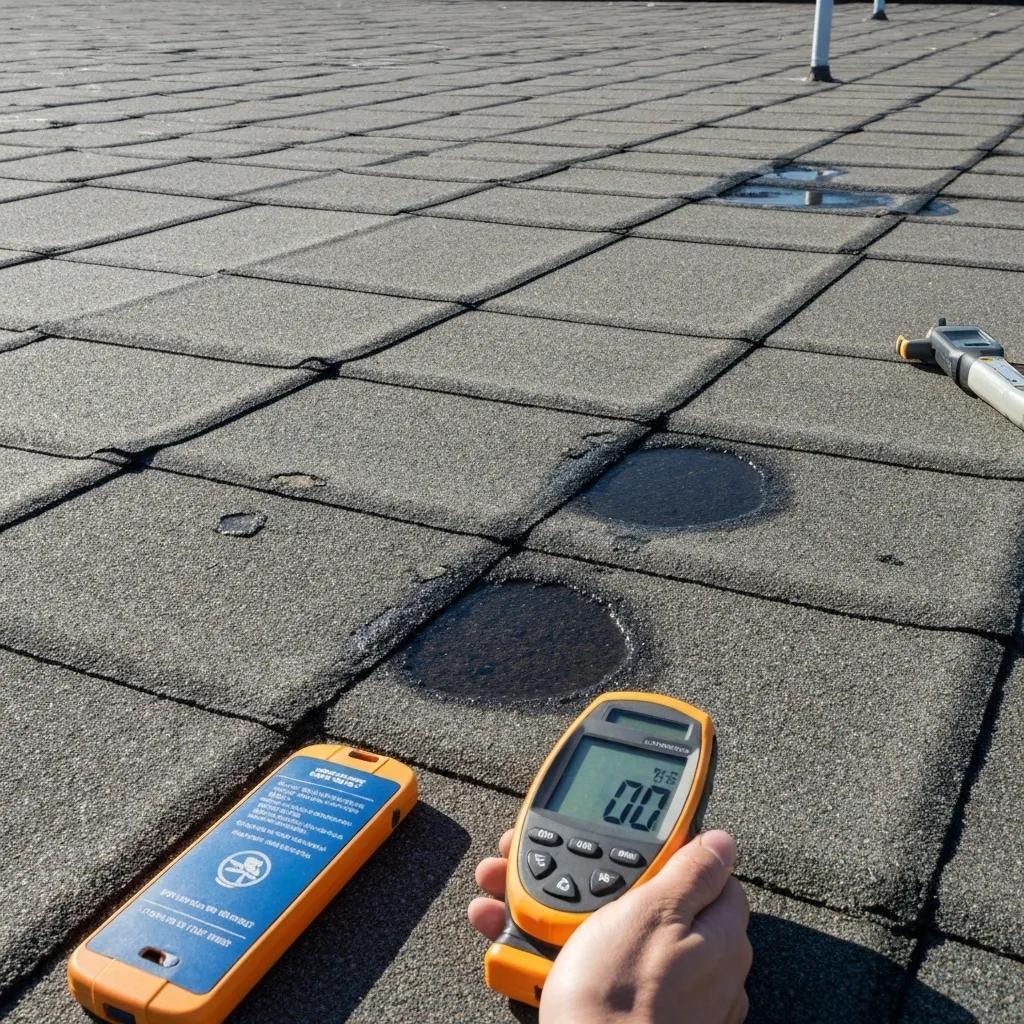
Routine inspections turn unpredictable emergency repairs into planned maintenance that’s easier to budget and schedule. Catching problems early preserves insulation and interior finishes by stopping moisture migration that leads to mold and higher energy bills which supports occupant safety and comfort. Inspections also protect warranty status by showing ongoing care, which matters when filing claims. Finally, documented inspections improve capital planning by enabling staged repairs ranked by urgency and cost-effectiveness. That’s why inspections should be part of an ongoing roof-maintenance program, not just an occasional response to visible leaks.
What common signs of commercial roof damage should you watch for?
Both interior and exterior clues point to roof stress or failure; spotting them quickly helps managers triage responses and allocate resources. Exterior signs include ponding water, membrane blisters, seam separation, tears, and corrosion on metal components. Interior signs include ceiling stains, soft spots, and musty odors from moisture intrusion. Flashings and penetration areas account for many leaks, so prioritize those spots during scans and document any suspect locations. The table below helps translate observations into likely causes and suggested immediacy of action so teams can choose between temporary mitigation, scheduled repairs, or urgent professional attention.
Common signs triage:
|
Observation |
Likely Cause |
Recommended Action |
|---|---|---|
|
Interior ceiling stains or mold |
Active or past leaks through the membrane or flashings |
Schedule a professional moisture assessment and document the extent |
|
Persistent ponding (>48 hours) |
Poor drainage, blocked scuppers, or insufficient slope |
Clear drains immediately; arrange a pro evaluation if it keeps recurring |
|
Membrane blisters, seam gaps, tears |
Material deterioration, thermal movement, or poor installation |
Temporary patches can help, but professional seam repairs are recommended |
|
Corroded metal fasteners or flashing |
Water retention or incompatible materials |
Inspect fasteners and flashings; prioritize replacement where corrosion is evident |
This triage table clarifies which observations need urgent professional attention and which can start with on-site housekeeping or temporary fixes.
How to identify water leaks and moisture damage early
Early moisture detection pairs visual checks with non-visual tools to uncover hidden wet areas before mold or structural damage sets in. Inside, watch for ceiling discoloration, sagging panels, peeling paint, and musty smells. Outside, inspect around penetrations, parapet walls, and roof drains where water commonly enters. Use moisture meters or thermal imaging under suspect conditions to map saturated zones not yet visible on the surface; capture photos and exact locations to guide repairs. Regular interior checks after rain events and consistent documentation reveal whether a problem is chronic or isolated. If non-visual tools show moisture beyond a few spots, escalate to a professional assessment for quantitative moisture mapping.
What visible indicators point to membrane and shingle deterioration?
Different materials show different failure modes: TPO may show seam separation or surface chalking, EPDM can shrink or split at seams, and standing-seam metal roofs can show fastener corrosion or seam creep. Membrane blisters, punctures, and repeatedly patched areas suggest substrate or adhesion problems beneath the surface. For shingle or modified bitumen systems, look for granule loss, edge curling, and cracks — all signs of aging and reduced protection. Note location and size of defects so repairs can be prioritized; widespread deterioration usually warrants a professional evaluation of remaining service life and warranty options.
How do flashing and drainage problems affect roof integrity?
Flashing and drainage are critical to the roof system. When flashings fail or drains clog, water sits where it shouldn’t, accelerating wear and adding structural load. Clogged scuppers and drains cause ponding, which increases hydrostatic pressure and leads to membrane creep, seam stress, and material fatigue over time. Gaps in flashing at penetrations focus leaks that can bypass surface repairs and damage insulation or decking below. Preventive maintenance — clearing debris, checking flashing seals, and confirming positive drainage — reduces the chance of cascading failures. Address flashing and drainage issues early to limit water damage and long-term replacement costs.
Which professional roof inspection techniques ensure thorough assessments?
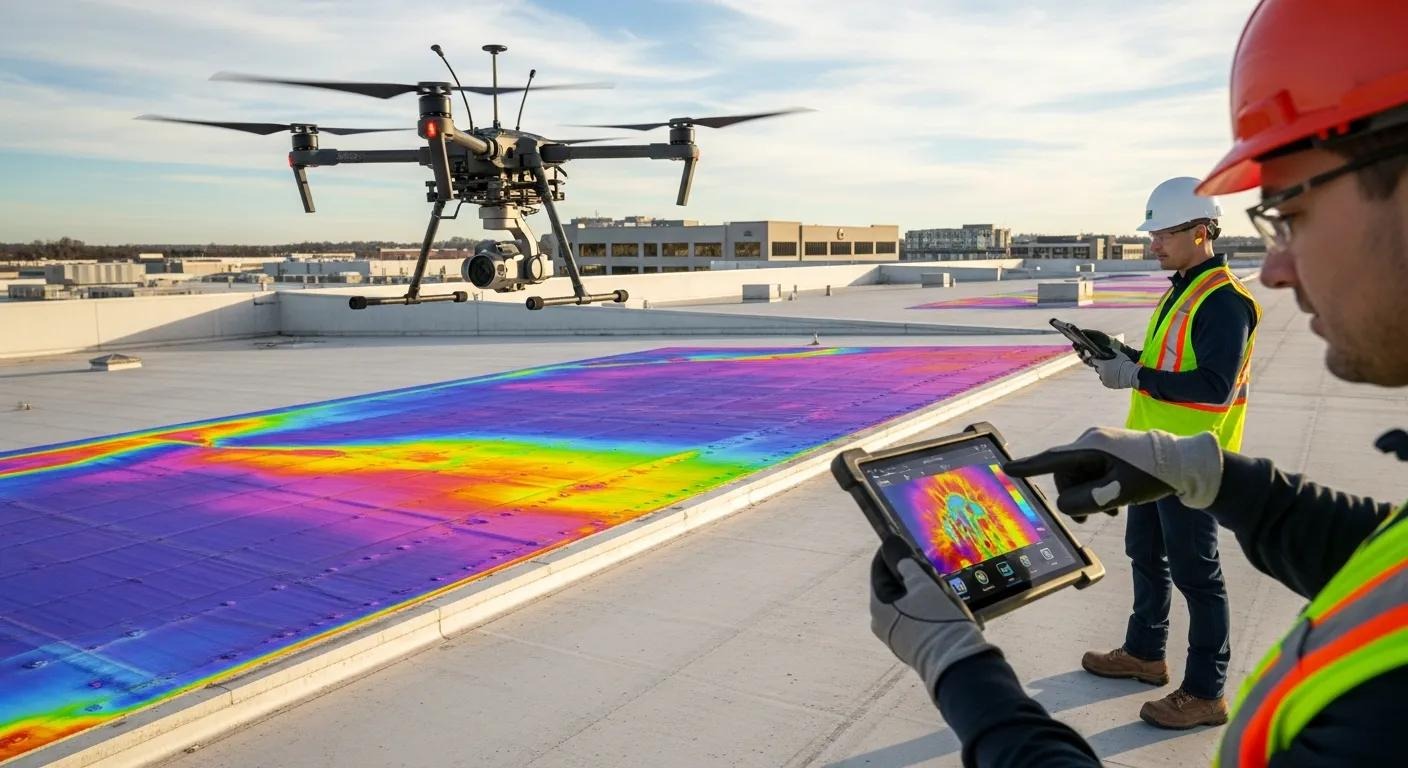
Professional inspections blend hands-on visual surveys with advanced diagnostics to uncover problems invisible to the naked eye and to quantify moisture intrusion and material failures. Techniques range from ground-level checks and on-roof tactile inspections to drone surveys, infrared thermography, and moisture meter scans — each targets different failure modes and supplies evidence for repair prioritization. A professional report usually includes high-resolution photos, annotated findings, prioritized recommendations, and cost options that feed directly into maintenance planning. The list below highlights common techniques and what they detect. Combining methods improves accuracy; these diagnostics are commonly used in comprehensive commercial roof assessments to create actionable reports for facilities managers.
Common professional techniques and what they detect:
-
Drone survey: high-resolution aerial images that map visible damage across large roofs safely.
-
Thermal imaging: shows moisture, wet insulation, and heat-loss patterns not obvious on visual inspection.
-
Moisture meter / core sampling: gives quantitative confirmation of moisture presence and depth.
The table below compares inspection techniques, tools, and ideal use cases for clearer decision-making.
|
Technique |
Tool / Method |
Benefit / When to Use |
|---|---|---|
|
Visual hands-on survey |
On-roof walk and tactile checks |
Best for assessing flashings, penetrations, and immediate defects |
|
Drone survey |
High-resolution aerial imagery |
Efficient for large or hard-to-access roofs and for mapping overall condition |
|
Thermal imaging |
Infrared camera |
Detects moisture and insulation gaps, especially after wetting events |
|
Moisture meter / core testing |
Electronic meter or physical core sample |
Confirms depth and extent of moisture for remediation planning |
Using multiple methods together improves diagnostic accuracy and supports prioritized repair planning.
Historic research examined several non-destructive moisture-detection methods, noting each method’s strengths and limitations.
Advanced Roof Moisture Detection: Infrared and Nuclear Survey Techniques
This research evaluated nuclear, infrared, capacitance, microwave, and impulse-radar techniques for nondestructive moisture detection in roofs. No single method was reliable enough on its own to remove the need for a few core samples of membrane and insulation to confirm findings. Airborne infrared surveys are a cost-effective way to screen many roofs, but follow-up on-roof surveys remain necessary. Of the grid techniques studied, nuclear surveys were the most reliable, while hand-held infrared proved the most accurate for on-roof work. Although infrared cameras cost significantly more than nuclear meters (roughly $27,000 vs. $3,000 at the time), infrared surveys can be done more rapidly; for many roofs, they appear the most cost-effective option. The study also measured thermal resistance of wet and dry insulation and developed laboratory methods for combining thermal and moisture gradients to build characteristic curves for various insulations.
What does a professional commercial roof inspection include?
A full professional inspection follows a consistent visual survey of the roof surface, penetrations, flashings, and drainage components and documents material conditions and immediate hazards. Inspectors evaluate roof geometry, slope, and ponding tendencies, test drains and scuppers for flow, and check mechanical penetrations and parapet terminations for secure flashing. Deliverables normally include photo-backed findings, a prioritized list of recommended repairs and maintenance tasks, and optional cost estimates to support budgeting and procurement. Commercial reports also address warranty implications and may recommend follow-up diagnostics where moisture or structural uncertainty exists. Those deliverables let facilities teams convert inspection results into staged action plans that reduce risk and fit asset-management budgets.
How are advanced tools like drones and thermal imaging used?
Drones quickly capture high-resolution aerial images across large roof fields so inspectors can spot membrane abrasion, seam problems, and debris without exposing crew to hazards. Thermal imaging detects temperature differences caused by wet insulation or air leaks; performed after rain or controlled wetting, thermography maps moisture patterns that indicate intrusion. Moisture meters and core samples validate thermal findings by measuring moisture content directly, producing a reliable diagnosis for remediation planning. Together, these tools cut inspection time, improve safety, and produce evidence-based recommendations for prioritized repairs. Integrating drone and thermal data into reports helps stakeholders visualize issues and justify budgeted repairs.
How can property managers perform effective DIY roof inspections safely?
Property managers can perform regular, safety-first inspections that give early warning of issues without replacing professional diagnostics. Use a clear checklist and escalation criteria. If roof access is limited, start with ground-level and interior checks: inspect drains, gutters, and visible roof fields from safe vantage points and document anomalies with photos and exact locations. When accessing the roof, follow fall-protection rules, wear PPE, and avoid walking near ponding or fragile areas. Focus on flashings, seams, and penetrations during the on-roof sweep. The checklist below gives a practical step-by-step routine, and the final note explains when observations should trigger a professional commercial roof assessment for diagnostics and a formal report.
A practical step-by-step DIY inspection checklist for property managers:
-
Safety first: confirm fall protection is in place, wear PPE, and do not access the roof in wet or windy conditions.
-
Ground and interior scan: check interior ceilings and exterior roofline for stains or sagging before rooftop access.
-
Roof surface check: look for ponding, blisters, tears, and debris; photograph and mark exact locations.
-
Flashings and penetrations: inspect seals at HVAC units, vents, and skylights for gaps, cracks, or corrosion.
-
Drainage inspection: clear debris from scuppers and drains and note any slow drainage or standing water.
This checklist helps managers catch actionable signs safely; if you find red-flag conditions — active leaks, extensive ponding, or structural sag — schedule a professional assessment promptly.
What are the step-by-step roof inspection checklist items for commercial properties?
When you perform an on-site inspection, start by verifying safety and then follow an orderly pattern to ensure full coverage and repeatability. After confirming PPE and fall protection, note weather conditions and take baseline photos of the whole roof field before a closer inspection; those photos serve as a reference for future comparisons. Conduct a methodical sweep: check membrane condition, seams, and surface irregularities; inspect parapet and penetration flashings; and test drains and scuppers for flow and clear blockages. Finish with interior checks of ceiling tiles, attics, and roof-mounted equipment for signs of moisture migration. Consistent order and photo documentation make findings actionable and easy to convert into repair priorities or professional referrals.
When should you call a professional for a commercial roof inspection?
Call a professional if a DIY inspection reveals active leaks, ponding that lasts more than 48 hours, visible structural sag, repeatedly patched areas, or widespread membrane deterioration — all signs that specialist diagnostics and repairs are needed. High-risk triggers include large-scale water intrusion affecting interior finishes, corrosion that compromises metal components, or unclear substrate or insulation saturation indicated by thermal scans or moisture meters. Delaying professional evaluation can increase repair costs and risk interior damage or operational downtime, so escalate quickly when you encounter red flags. Professional commercial roof assessments combine visual and advanced diagnostics and deliver a prioritized report with recommendations.
What are best practices for preventative commercial roof maintenance?
Preventative maintenance stops small problems from becoming major failures through routine cleaning, scheduled inspections, and targeted repairs that reflect roof type and local climate. Core tasks include regular debris removal, scupper and gutter clearing, vegetation control, sealant inspections, and periodic re-securing of fasteners and flashings. In Texas and Oklahoma, seasonal timing matters: prioritize spring checks after pollen and storm cleanup and fall checks to prepare for winter rain and temperature swings, both of which affect ponding risk and thermal movement. The table below compares roof types, maintenance actions, and suggested frequencies to help facilities teams allocate resources efficiently. After the table, concise maintenance items teams can add to routine building upkeep are summarized.
Preventative maintenance checklist highlights:
-
Clear debris and vegetation monthly or after major storms.
-
Inspect drains, scuppers, and gutters seasonally and after heavy rainfall.
-
Monitor and document ponding areas and address drainage issues proactively.
The table below outlines roof-type-specific maintenance priorities and recommended frequency.
|
Roof Type |
Key Maintenance Need |
Frequency / Recommended Action |
|---|---|---|
|
Flat roof (TPO/EPDM/modified) |
Drain maintenance and membrane inspection |
Inspect biannually; clear drains monthly during the wet season |
|
Standing seam metal roof |
Fastener and seam checks, corrosion control |
Inspect annually and after storms; tighten or replace fasteners as needed |
|
Low-slope membrane with rooftop equipment |
Flashing and penetration review |
Inspect after any equipment work and biannually for seal integrity |
How to maintain flat roofs and prevent ponding water
Ponding on flat roofs comes from inadequate slope, blocked drains, or settling. Address it with immediate housekeeping and strategic fixes. Short-term steps: clear drains and scuppers, remove items that trap water, and use temporary routing measures if needed. For chronic ponding, consider tapered insulation to improve slope, adding drains, or retrofit options to improve outflow — schedule a professional evaluation when ponding returns after cleaning. Record ponding locations with photos and timestamps to show persistence and guide contractors where design changes are required. Regular documentation and timely remediation reduce membrane fatigue and extend roof life.
Key maintenance tips for standing seam metal roofs
Standing seam metal roofs need attention to thermal movement, fastener integrity, and corrosion prevention to avoid seam separation and leaks. Check seams for distortion, ensure clips and fasteners are secure (not over-torqued), and inspect sealants at penetrations and transitions for cracking. Remove debris and trim overhanging vegetation to lower moisture retention and abrasion risk. Treat surface corrosion promptly and replace compromised fasteners or panels as needed. Annual inspections and post-storm checks catch issues early; when thermal cycling or fastener problems are suspected, a professional assessment will determine if repairs or clip replacements are necessary. Proper maintenance minimizes leaks and protects the metal roof’s long-term performance.
How comprehensive roof assessments support optimal maintenance
Comprehensive roof assessments turn inspection findings into practical maintenance and repair roadmaps that support budgeting and reduce risk. These assessments combine hands-on visual surveys with targeted diagnostics including drone imagery and thermal scanning when appropriate to document conditions across flat and standing-seam metal roofs common in various regions. Deliverables include photo-backed findings, a prioritized list of recommended actions, and optional cost estimates to aid decision-making. Such evaluations are especially useful after severe weather or when issues keep recurring. The section below outlines what comprehensive assessments include and how resulting reports support staged maintenance planning.
Comprehensive assessments deliver clear value:
-
Comprehensive documentation: annotated photos and diagnostic data to back repair decisions.
-
Prioritized recommendations: staged actions ranked by urgency and cost-effectiveness.
-
Consultative approach: clear next steps without obligation, plus emergency repair options if needed.
These deliverables help facilities teams move from observation to a funded maintenance plan with confidence.
What is included in a comprehensive commercial roof assessment?
The assessment typically includes an on-site visual inspection of the roof surface, flashings, penetrations, and drainage elements, supplemented with drone imagery and thermal scans when indicated to uncover hidden moisture. Findings are compiled into a photo-backed report that prioritizes issues by urgency, recommends maintenance and repair actions, and offers optional cost estimates for budgeting. The service emphasizes clear documentation to support warranty claims and insurance as appropriate, and the process includes emergency repair options for critical failures. Property managers receive a detailed, evidence-based snapshot of roof condition that informs immediate triage and longer-term capital planning.
How does a detailed roof inspection report inform maintenance plans?
A detailed inspection report converts observations into prioritized tasks by classifying items as safety-critical, repair-priority, or routine maintenance, which enables staged budgeting and efficient procurement. Reports that pair photos, diagnostic results, and recommended timelines make it easier to justify spending to stakeholders and align repairs with operations. They also document care for warranty and insurance claims by showing a clear chronology of observed defects. With a structured report, facilities teams can sequence repairs — fix safety and leak sources first, then schedule preventative tasks — extending roof life and reducing unplanned downtime.
Conclusion
Regular commercial roof inspections are essential to protect your building, cut long-term costs, and extend roof life. Spotting issues early helps avoid costly repairs, maintain safety and warranty compliance, and plan predictable maintenance. Moving to a proactive approach with comprehensive assessments and routine care supports sustainable roof asset management and operational continuity. Trusting expert inspections and following proven maintenance protocols is a critical investment in your property’s value and safety. For a deeper dive into effective roof care, download our free maintenance ebook at Trivan Roofing’s Roof Asset Management to empower your team with best practices and actionable guidance.
Protect Your Investment with Expert Roof Inspections
Get a comprehensive commercial roof assessment that identifies problems before they become expensive emergencies. TriVAN Roofing provides free detailed inspections using drone surveys, thermal imaging, and moisture detection to uncover hidden issues across flat and metal roof systems. Our photo-documented reports prioritize repairs by urgency and include cost estimates for budget planning. As certified specialists serving Texas and Oklahoma, we deliver actionable assessments that support proactive maintenance and extend roof life.
Contact Us Today