
Commercial Roof Flashing Repair: Fixing Leaks at Parapets, HVAC Curbs, and Penetrations
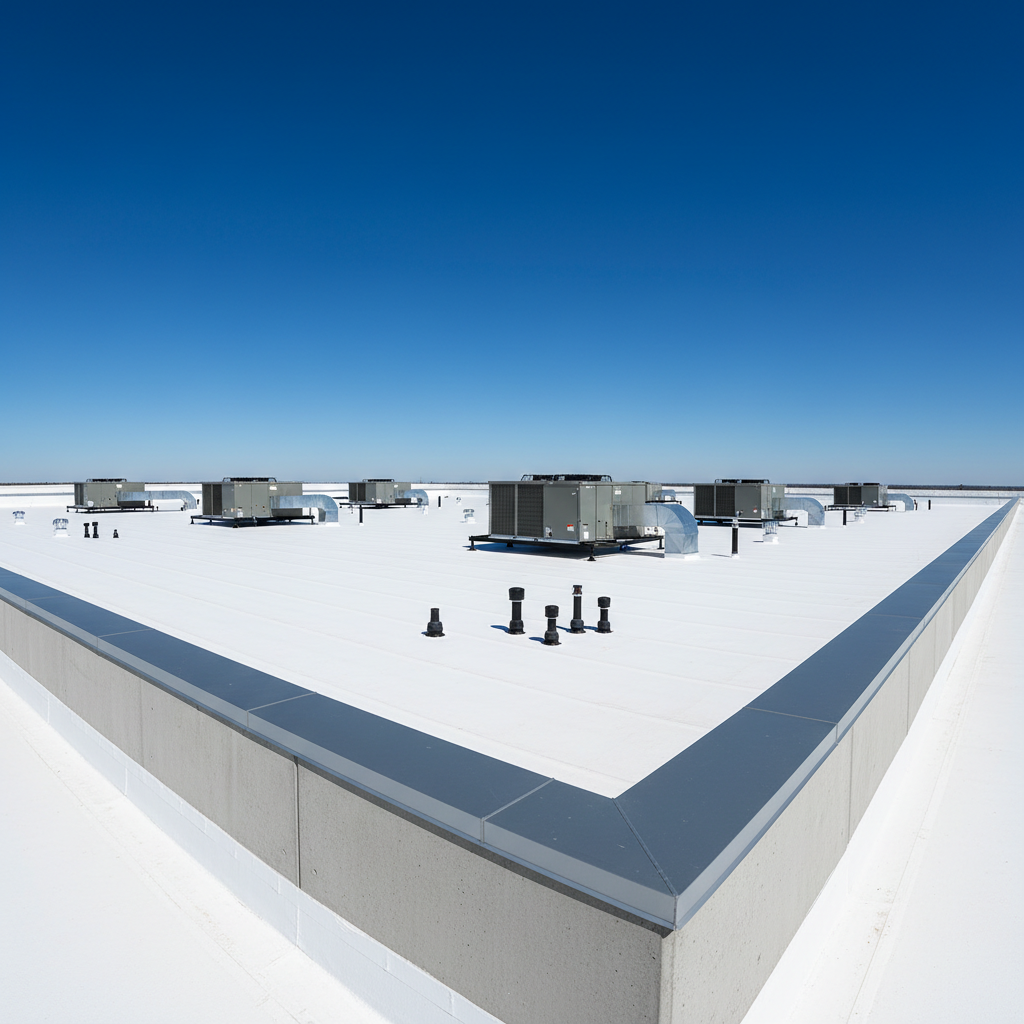
Most commercial leaks occur at flashing transitions, not open field membrane. Learn how to diagnose and repair flashings at parapet walls, rooftop equipment curbs, and pipe penetrations across Texas and Oklahoma commercial buildings.
Search online for roof flashing repair, and almost every result shows you a residential pitched roof. You will find diagrams of thin aluminum step flashing tucked under asphalt shingles along a brick chimney, or valley metal running between two roof slopes. That information is completely useless if you manage an industrial warehouse, a shopping center, or an office complex with a low-slope roof.
Commercial roof flashing is an entirely different discipline. On a low-slope or flat roof, flashing does not simply direct shedding water down a steep incline. It creates a continuous, watertight, hydrostatic seal where the primary roof membrane terminates against vertical building elements. It seals the transitions at masonry parapet walls, structural concrete bulkheads, rooftop HVAC package units, vent pipes, electrical conduits, and structural steel supports.
According to long-standing guidelines from the National Roofing Contractors Association (NRCA), approximately 90 percent of all reported roof leaks occur at flashing locations, terminations, walls, and penetrations. Technical research published through the International Institute of Building Enclosure Consultants (IIBEC) confirms that equipment curbs sit on equal footing with parapet walls as the most common sources of non-membrane water intrusion. Furthermore, many commercial roofing contractors report from field experience that more than 80 percent of active leaks originate at flashings or field seams rather than punctures in the open membrane. While that 80 percent figure represents a practical contractor benchmark rather than a controlled academic study, field inspections across North Texas and Oklahoma consistently prove the point: if water is dripping into your building, it is almost certainly entering through a transition detail.
Flashings represent less than five percent of a commercial roof's total surface area, yet they absorb the vast majority of physical stress. Below, we break down how and why flashings fail across the three biggest trouble spots on commercial roofs: parapet walls, HVAC curbs, and penetrations. We also cover realistic repair procedures, cost ranges, and the engineering logic behind repairing versus replacing these critical details.
Parapet Wall Flashings: Base, Counter, and Coping Failures
Parapet walls frame the perimeter of most commercial flat roofs. They serve critical architectural, fire-containment, and wind-deflection functions, but they introduce two continuous horizontal transitions that run the entire circumference of the building: the base where the horizontal deck meets the vertical wall, and the top where the wall terminates under a metal coping cap.
A standard parapet flashing detail consists of two primary parts working together:
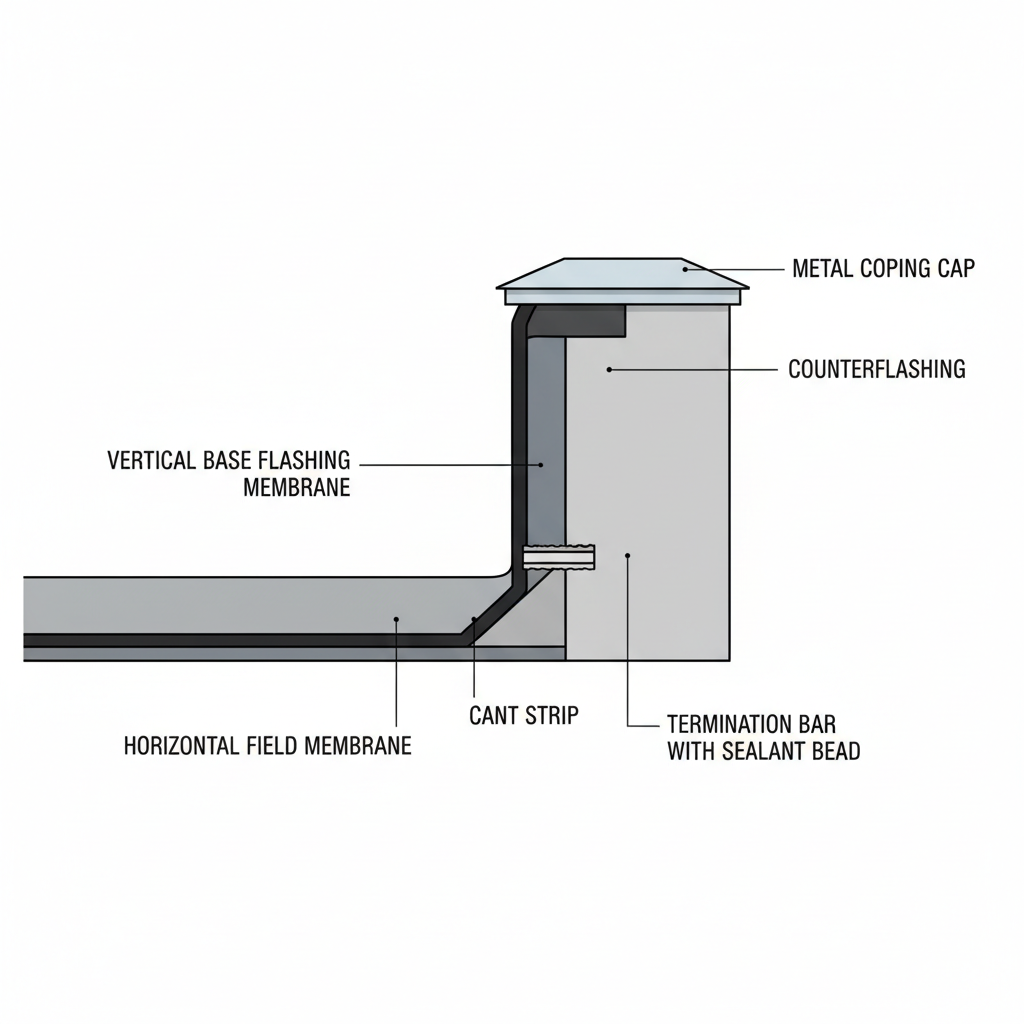
- Base Flashing: The lower component, typically composed of the same material as the roof membrane (such as TPO, PVC, EPDM, or modified bitumen). It extends out of the horizontal roof field, turns ninety degrees upward, and climbs the vertical wall. NRCA technical manuals specify a minimum base flashing height of 8 inches above the finished roof surface. This height ensures that normal standing water, wind-driven rain, or melting hail cannot lap over the top of the membrane before reaching the roof drains.
- Counterflashing: The upper component, usually fabricated from sheet metal. It overlaps the top edge of the base flashing by at least three to four inches. The upper lip of the counterflashing is mechanically anchored into the wall substrate, often cut into a masonry mortar joint or reglet groove, and sealed along its top edge with a high-grade elastomeric sealant.
Why Parapet Base Flashings Fail
The primary driver of base flashing failure is differential movement. Commercial roof decks and exterior parapet walls are built from dissimilar materials that react differently to structural and thermal loads. A steel roof deck moves, deflects, and vibrates independently from a perimeter poured-concrete or concrete masonry unit (CMU) wall. During seasonal temperature swings in Texas and Oklahoma, where rooftop surface temperatures can swing from below freezing to over 150 degrees Fahrenheit, this movement creates continuous shear stress along the junction.
Diagonal wrinkles appearing across vertical base flashings are an unmistakable warning sign. These wrinkles indicate that the parapet wall and the roof deck are moving independently, twisting the membrane along the transition angle. When base flashings are adhered directly across this corner without proper cant strips or without anchoring the base flashing to the structural deck, the membrane pulls away from the wall. This creates a hollow tented pocket (bridging) at the inside corner that easily punctures under foot traffic or splits open along welded seams. To prevent this, standard NRCA details recommend fastening treated wood blocking or structural steel angles directly to the deck along the base of the wall, providing an isolated substrate that absorbs deck movement without tearing the vertical flashing.
Reglet Sealant Breakdown and Counterflashing Separation
Counterflashing protects the top termination of the base membrane from water running down the vertical face of the wall. In surface-mounted assemblies, a metal termination bar is screwed into the wall, and a bead of sealant is applied across the top lip. In reglet assemblies, a metal receiver is inserted into an open mortar joint or a saw-cut groove in the concrete.
The weak link in this detail is almost always the sealant. Industry contractors in coastal markets like Florida frequently note that reglet sealant joints exposed to intense ultraviolet radiation and humidity can begin breaking down in as little as 5 to 7 years, requiring a routine five-year maintenance cycle. While conditions in Texas and Oklahoma differ, our climate is equally punishing. Prolonged periods of triple-digit summer heat dry out polyurethane and silicone sealants, causing them to shrink, crack, and pull away from the masonry. Once that bond breaks, rainwater running down the vertical parapet wall enters directly behind the counterflashing, slips behind the top of the base membrane, and enters the building interior without ever touching the horizontal roof surface.
To understand the full scope of exterior perimeter leaks, review our detailed guide on parapet wall leak causes and masonry moisture paths. Where large commercial buildings experience extreme thermal expansion, property owners should also inspect dedicated building expansion joints that accommodate structural movement along perimeter firewalls.
HVAC Curbs and Equipment Supports: Vibration and Heat Stress
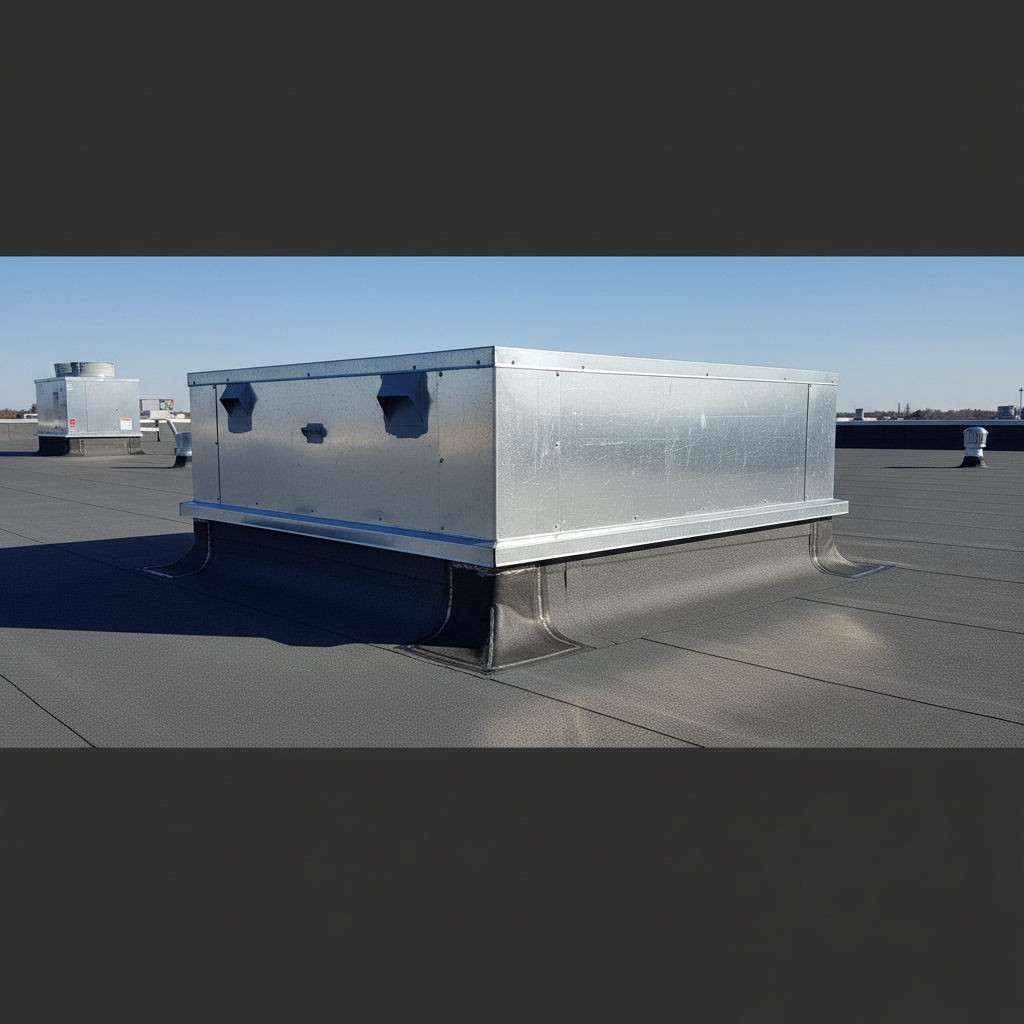
Rooftop package units (RTUs), exhaust fans, air makeup units, and skylights sit on elevated box frames known as equipment curbs. In modern commercial construction, equipment curbs generate just as many non-membrane leak calls as parapet walls. They create a concentrated island of mechanical and thermal stress right in the middle of the roof system.
The Unique Stresses of Commercial Curbs
An HVAC curb does not sit quietly on the roof deck. It supports heavy machinery containing electric motors, spinning fan assemblies, and reciprocating compressors. This machinery transmits low-frequency mechanical vibration into the curb structure around the clock. At the same time, the curb experiences dramatic temperature cycles. The internal ductwork carries chilled air in the summer and heated air in the winter, creating an extreme thermal gradient between the inside and outside of the curb wall.
Forensic engineering firm Rimkus notes that cracking or physical separation at the curb-to-membrane transition is one of the most direct and reliable indicators of flashing failure. As the membrane expands and contracts against a vibrating metal or wood curb, adhesives shear off. If the roofing membrane was terminated without proper mechanical fastening around the top of the curb perimeter, the vertical membrane will slip down the curb face, opening a horizontal gap for wind-blown rain.
Forensic engineering investigations by Rimkus frequently point out that units set directly onto roof membranes or supported by loose timber blocking are prime candidates for persistent water intrusion.
Setting heavy condensing units or ductwork on loose wood 4x4s crushes the insulation package underneath the membrane. Over time, building vibration grinds the wood fibers directly into the single-ply or modified bitumen sheet, creating fatigue punctures that are hidden beneath the equipment. Curbs must always be built as elevated, structurally anchored components that provide at least 8 to 12 inches of vertical clearance between the roof membrane level and the bottom of the HVAC equipment base.
Why HVAC Techs Should Never Flash Roof Curbs
One of the most frequent causes of curb leaks is unauthorized work by mechanical contractors. When an older RTU is replaced, the mechanical crew often needs to install an adapter curb or modify the existing platform. Too often, mechanical technicians attempt to flash these transitions using whatever materials they have on their trucks: unreinforced aluminum tape, elastomeric mastic smeared over dirty plastic, or silicone caulk applied over damp TPO.
These improvised seals fail rapidly. Single-ply roofing membranes like TPO and PVC require heat-welded seams executed with specialized robotic or hand-held welding equipment running at precise temperatures. They require specific solvent cleaners, chemical primers, and factory prefabricated target corners to seal the complex geometric angles where the curb meets the roof deck. Allowing an HVAC technician to patch or modify roof membrane flashings compromises water integrity and directly leads to mechanical contractor roof damage that can instantly void your manufacturer No Dollar Limit (NDL) warranty. Roof curb flashing must always be performed by a certified commercial roofing contractor.
Roof Penetrations: Conduits, Pipe Clusters, and Pitch Pockets
Every commercial roof is penetrated by dozens or even hundreds of building service lines: plumbing soil stacks, electrical conduits, refrigeration lines, lightning protection rods, structural davit arms, and gas supply piping. Each individual hole through the roof deck creates a vulnerability where water can bypass the membrane.
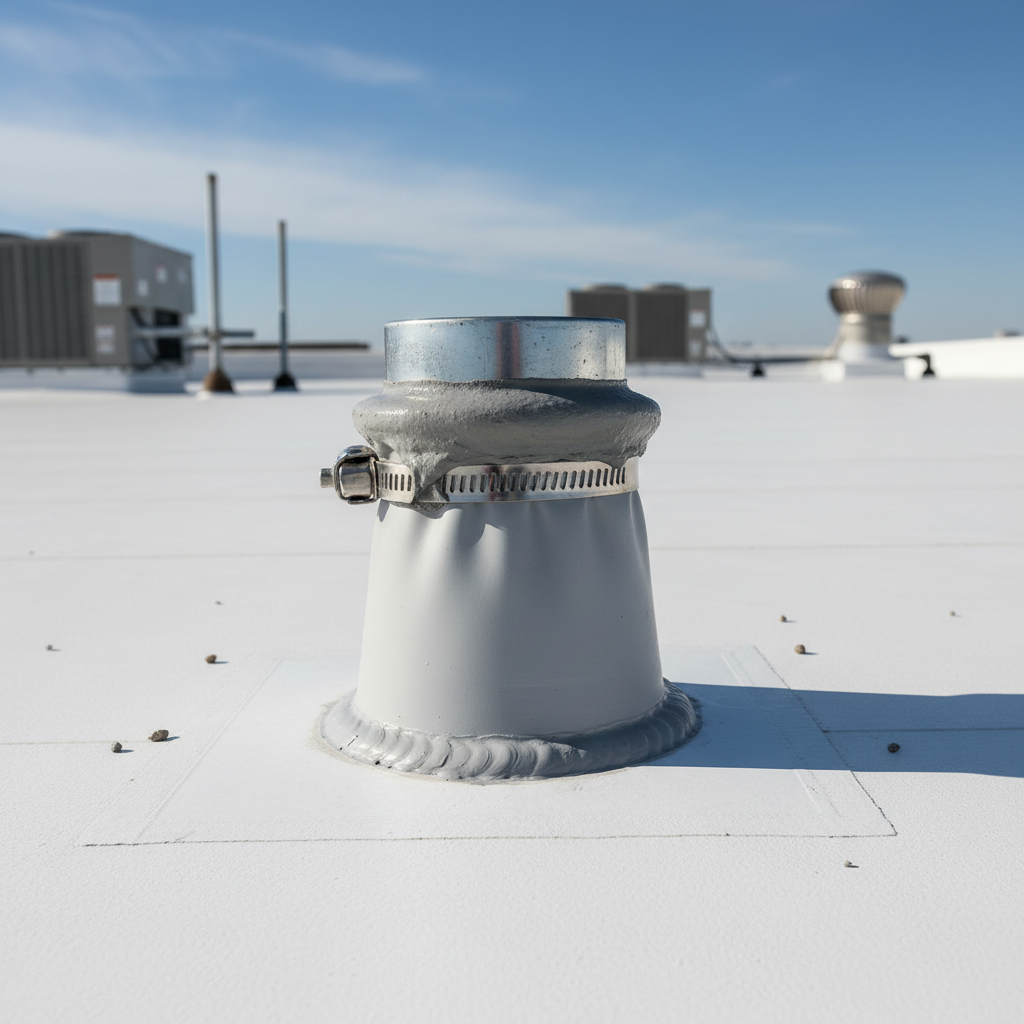
The standard commercial detail for single circular penetrations is a prefabricated pipe boot. These molded components, manufactured from TPO, PVC, or molded EPDM, feature a wide horizontal flange that heat-welds directly to the field membrane, and a tapered vertical sleeve that fits snugly around the pipe. The top edge of the boot is secured with a stainless steel draw band (clamping ring) and topped with a continuous bead of compatible polyurethane or silicone sealant.
Flashing Over Insulation: A Hidden Forensic Flaw
One of the most subtle, destructive installation errors identified by forensic engineering evaluations involves insulated pipes, such as chilled water lines or hot refrigerant loops. Rimkus investigators emphasize that when inspectors encounter a soft, waterlogged spot immediately surrounding an insulated pipe penetration, it often indicates that the original roofing contractor applied the flashing boot directly over the outer insulation jacket rather than against the bare pipe.
When piping carries hot or cold fluids, clamping a flashing boot directly over soft fiberglass or foam insulation creates an unstable joint that crushes, loosens, and allows rain into the insulation core.
Once water enters the permeable insulation jacket, it travels unimpeded down the length of the pipe, bypasses the flashing entirely, and pours into the structural ceiling assembly below. Correct commercial detailing requires the insulation to be terminated above the flashing level, allowing the pipe boot to clamp directly against the solid, bare metal or PVC pipe wall. An independent sheet metal rain collar (umbrella) is then clamped above the boot to shelter the top edge, and the pipe insulation resumes above the rain collar.
The Problem with Legacy Pitch Pockets
On older roofs, or where irregular penetrations like structural I-beams, angle irons, or clustered electrical conduits pass through the deck, contractors historically installed pitch pockets (also called pitch pans). A pitch pocket is an open metal pan flanged onto the roof membrane, forming a reservoir around the penetrating items. The reservoir is filled with a grout base and topped with pourable sealer or asphalt mastic.
Pitch pockets are notorious maintenance headaches. The pourable sealer shrinks and hardens over time, pulling away from the sides of the metal pan and the conduit walls. Once small fissures open, rainwater pools in the pan and drips straight through the deck opening. Modern commercial standards strongly favor retrofitting pitch pockets with prefabricated split pipe boots, engineered metal enclosure hoods (dog houses), or factory-engineered sealable penetration pockets filled with moisture-curing elastomeric chemistries.
Warning Signs: Diagnosing Flashing Failures Before Interior Flooding
Interior ceiling leaks are trailing indicators of roof failure. By the time water drips onto an office desk or a warehouse inventory rack, the insulation board beneath the membrane is often saturated over a wide radius. Regular roof inspections should target the physical symptoms of flashing deterioration long before water breaks through the deck:
- Horizontal or Diagonal Membrane Wrinkles: Wrinkles along base flashings or curb corners indicate differential structural movement or loss of vertical adhesion.
- Open Flashing Laps: Probe the edges of membrane seams along walls and curbs. A seam probe should not be able to slip beneath any lap edge. If the weld has popped, wind-driven moisture will enter whenever rain blows across the deck.
- Cracked, Crazed, or Dried Sealant: Any reglet or termination bar sealant that has hardened, shrunk, or pulled away from the masonry requires immediate raking and resealing.
- Corrosion and Rust on Counterflashings: Rusted metal edges, loose reglet clips, or missing fasteners permit wind to peel metal away during severe storm events.
- Tenting and Bridging at Inside Angles: Walk the perimeter. If the membrane is stretched tight like a drumhead across the junction where the wall meets the deck without resting flat against the substrate, it will eventually tear.
- Interior Staining Patterns: Water stains on exterior perimeter walls, damp drywall near firewalls, or corrosion on steel columns directly underneath rooftop HVAC units almost always trace back to flashing failures directly above.
Repair vs. Replace: How Commercial Owners Should Decide
When an inspection identifies failed flashings, building owners face an operational decision: can the details be cost-effectively repaired, or do they signal that the roof has reached the end of its useful service life?
When Repair Makes Sense
Targeted flashing repairs are technically viable and financially prudent when the surrounding field membrane remains sound, flexible, and well-adhered. Favorable conditions for repair include:
- Isolated Mechanical Damage: An HVAC technician accidentally tore a corner boot, or a rooftop access ladder punctured a base flashing.
- Localized Sealant Failure: The reglet counterflashing sealant has dried out along a parapet wall, but the underlying base membrane remains fully bonded and undamaged.
- Failed Penetration Boots on a Younger Roof: Premolded boots on plumbing vents have cracked due to UV degradation on a roof membrane that is only 8 to 10 years into an expected 20-to-25-year lifespan.
- Dry Insulation Core: Thermal moisture scans or core cuts confirm that water has not traveled into the polyisocyanurate insulation substrate surrounding the leak.
When Reflashing at Full Replacement Is Required
Attempting to repeatedly patch flashing details on a compromised roof is throwing good money after bad. Total replacement of the flashing assembly or full roof replacement is indicated when:
- Widespread Membrane Embrittlement: The flashing membrane has lost its plasticizers. If bending the edge of the sheet causes micro-cracking, adhesives and heat-welds will no longer fuse reliably.
- Extensive Saturated Substrate: Moisture has saturated the perimeter insulation boards or rotted the wood blocking inside the parapet. New flashings cannot be adhered to wet or deteriorated substrates.
- Systemic Bridging Along Entire Walls: If hundreds of linear feet of parapet base flashing have detached from the walls due to structural movement, spot repairs will simply shift stress to the next weakest point.
- Multi-Layer Patches: The curb or wall is coated in multiple layers of dried asphalt mastic, fibered coatings, and silicone patches from previous contractors. Scraping down to clean original membrane becomes more expensive than full curb reconstruction.
To evaluate these decisions within your overall capital budget, consult our guide to commercial roof repair cost factors.
Commercial Roof Flashing Repair Procedures
Successful commercial flashing repair is not a matter of spreading asphalt cement from a bucket. Low-slope single-ply and modified bitumen systems require strict adherence to manufacturer-approved engineering standards. For broader procedures regarding active leak mitigation, review our comprehensive commercial roof leak repair procedures.
1. Matching Chemistry and Substrates
You cannot effectively repair a TPO roof with EPDM adhesives, nor can you patch PVC with standard asphalt mastic. Solvents in petroleum-based mastics dissolve PVC and TPO formulations, accelerating membrane destruction. Repairs must use identical polymer formulations: virgin TPO to aged TPO, PVC to PVC, and SBS modified sheets to SBS systems. When welding new single-ply membrane patches to existing weathered sheets, the old membrane must be thoroughly washed with specialized cleaners to remove oxidation and grime before heat-welding will take hold.
2. Proper Parapet Base and Counterflashing Repair
When repairing a failed parapet termination:
- Remove the existing metal counterflashing or termination bar entirely. Cut away all loose, unbonded, or blistered base membrane down to clean, dry substrate.
- Replace any rotted wood nailers or deteriorated gypsum coverboard.
- Mechanically anchor the top of the horizontal field membrane at the deck transition using approved plates and fasteners.
- Adhere a new commercial base flashing sheet using manufacturer-specified contact adhesive, extending at least 8 inches up the vertical wall and hot-air welding the lower lap at least 4 inches into the field membrane.
- Secure the top edge with a heavy-duty extruded aluminum termination bar, installing fasteners into the wall every 6 to 8 inches.
- Reinstall or replace the metal counterflashing reglet, filling the top receiver joint with a premium polyurethane or non-sag silicone sealant tooled with a downward slope to shed water.
3. Proper Equipment Curb Reflashing
To properly reflash an HVAC curb, the unit must be temporarily lifted if there is inadequate clearance below the framework. The contractor wraps the four vertical walls of the curb with new membrane, stepping past all mechanical fastenings. Crucially, the roofer installs prefabricated, injection-molded commercial target corners. Trying to fold flat field membrane around three-dimensional outside corners creates thick, clumsy seams that fail under freeze-thaw cycles. Molded commercial corners fuse cleanly to provide complete water barrier protection.
4. Verifying Repairs: The Sequential Water Test
How do you verify that a complex flashing repair is completely watertight before the next severe storm hits? High-performing commercial contractors use sequential water testing. Rather than soaking the entire roof at once, the diagnostic team isolates components systematically from bottom to top:
- Apply a controlled stream of water exclusively to the horizontal field laps around the base of the curb or wall for 15 to 20 minutes while an observer monitors the building interior.
- If no moisture enters, raise the water stream to the vertical base flashing membrane and welded corners for another 15 minutes.
- Finally, direct water across the metal counterflashing reglet and coping caps above.
By wetting components sequentially from low points to high points, technicians pinpoint the precise entry path. To understand how forensic roofers isolate elusive building leaks, read about our systematic commercial roof leak diagnostics.
Commercial Roof Flashing Repair Costs
Commercial flashing repairs vary in cost based on accessibility, safety requirements, membrane type, and detail complexity. Unlike residential repairs, commercial projects involve certified union or factory-trained labor, formal fall protection plans, commercial-grade sheet metal fabrication, and certified manufacturer materials.
The following ranges reflect typical commercial flashing repair costs across Texas and Oklahoma commercial properties:
- Single Penetration Boot Repair or Replacement: $250 to $600 per penetration. This covers cutting out damaged or cracked boots, cleaning the membrane, welding a new premolded single-ply boot or split-boot, and installing new stainless steel clamping bands and sealants.
- Pitch Pocket Retrofit: $350 to $750 per unit. Includes cleaning out deteriorated asphalt mastic, re-securing the metal pan, and installing engineered chemical penetration seals or custom metal dog-house hoods.
- HVAC Equipment Curb Reflashing: $800 to $2,500 per curb. Pricing depends heavily on curb dimensions, electrical conduit interference, and whether the mechanical unit must be raised with rigging to achieve minimum 8-inch flashing clearance.
- Parapet Base Flashing and Counterflashing Repair: $15 to $35 per linear foot. This range includes removing failed termination materials, installing new single-ply or modified bitumen base flashing, fastening heavy-duty termination bars, and fabricating/installing new 24-gauge metal counterflashing.
- Emergency Flashing Containment: $450 to $1,200. Temporary same-day water diversion and seal stabilization during storm conditions to protect building interior assets until permanent welded repairs can be scheduled.
Why Regional Climate Demands Precision Flashing in Texas and Oklahoma
Commercial roofs in the central hail corridor face distinct operational challenges. A flashing detail that holds up in temperate coastal climates can fail rapidly when subjected to North Texas and Oklahoma weather patterns. Our buildings experience 100-degree ambient summer afternoons that push white TPO membrane surface temperatures past 150 degrees, followed by sudden, violent thunderstorm downdrafts that drop ambient temperatures by 30 degrees in minutes. This thermal shock causes instant structural contraction, stressing every termination seam and reglet joint on the roof.
Furthermore, spring storm systems across the Dallas-Fort Worth metroplex, Greater San Antonio, Oklahoma City, and Tulsa generate severe straight-line winds and large hail. When high winds hit vertical parapet walls, they create negative pressure vortices that forcefully lift loose flashings. If hail stones hit unbacked single-ply membrane bridging over an inside curb angle, the unsupported membrane easily punctures. Commercial building enclosures in this region require robust mechanical anchoring, heavy-gauge perimeter metal, and disciplined flashing installation designed for severe environments.
Commercial Roof Flashing Repair FAQ
Why do most commercial roof leaks occur at flashings rather than the membrane?
Flashings bridge transitions between dissimilar materials such as metal, concrete, masonry, and single-ply membranes. These materials expand and contract at different rates under thermal stress. National roofing associations estimate that approximately 90 percent of all commercial leaks occur at flashing terminations, walls, and penetrations where this movement stresses adhesives, fasteners, and sealants.
How much does commercial roof flashing repair cost?
Commercial flashing repair costs vary by detail. Isolated pipe penetration boot repairs or pitch pocket replacements typically range from $250 to $600 each. Reflashing an HVAC curb generally costs between $800 and $2,500 depending on curb size and unit clearance. Parapet base and counterflashing repairs typically range from $15 to $35 per linear foot.
Can HVAC technicians repair roof curb flashings?
No. Mechanical contractors should never install or modify commercial roof flashings. Flashing work requires certified roofing procedures, specialized membrane welding equipment, and manufacturer-approved primers and adhesives. Improper curb flashing done by mechanical trades can compromise water integrity and void manufacturer warranties.
What is the minimum height for commercial base flashing?
NRCA technical standards specify an 8-inch minimum vertical base flashing height above the finished roof line for both parapet walls and rooftop equipment curbs. This height prevents standing water, drifting hail, or heavy rain runoff from overtopping the membrane before entering the drainage system.
Protecting Your Commercial Facility with TriVAN Roofing
TriVAN Roofing has protected commercial property assets across Texas and Oklahoma since 2001. As a woman-owned commercial roofing contractor holding GAF Master Elite status (top 2 percent nationwide) and Duro-Last Elite Contractor certification (top 3 percent nationwide), our technical teams specialize in low-slope commercial roof systems, complex flashing assemblies, and structural transitions.
We provide full manufacturer No Dollar Limit (NDL) warranty coverage up to 15 years that covers consequential damage and ponding water. Whether you manage a municipal building, a public school district through our active TIPS purchasing contracts, an industrial warehouse, or a commercial retail center, we have the regional expertise to diagnose and resolve flashing failures permanently. Call TriVAN Roofing today at 877-487-4826 to schedule your commercial flashing inspection.
Ready to Protect Your Facility?
Commercial roof leaks rarely start out in the open field membrane. They start at the complex perimeter details: along tall parapet walls, underneath vibrating rooftop air conditioning units, and around pipe penetrations where thermal expansion pulls seams apart. If water is entering your facility around equipment or perimeter walls, you need experienced roofers who understand low-slope engineering, not quick caulking jobs that peel away after one summer. TriVAN Roofing has served commercial property owners across Texas and Oklahoma since 2001. Call our project team at 877-487-4826 or contact us online to schedule a detailed flashing evaluation today.
Contact Us Today